


IoT Edge Runtime with AWS Greengrass. Setup.
A Beginner's Guide to IoT Edge Runtime using AWS Greengrass


Introduction
In this part, we will jump straight to configuring and deploying AWS Greengrass. The first step will be to build a local docker image, the next step is to get AWS credentials for your deployment and the last thing is to launch your AWS Greengrass Thing.
All steps are based on an official tutorial Run AWS IoT Greengrass Core software in a Docker container - AWS IoT Greengrass (amazon.com)
Parts
This series consists of four parts, each part is independent of another.
Introduction. In this part, we are talking about the use case and the AWS Greengrass itself
Setup. Here I'll show how to quickly launch Greengrass as a docker image on our computer
Prerequisites
AWS account creation
You need an AWS account :) Please follow Create and activate an AWS account | AWS re:Post (repost.aws) if don't have one.
AWS CLI installation and configuration
To configure the AWS CLI tool please follow Install or update the latest version of the AWS CLI - AWS Command Line Interface (amazon.com)
I highly recommend using AWS Identity Center (formerly known as AWS SSO) to get temporary credentials for your AWS CLI. To configure AWS Identity Center even for a single AWS account please follow the article from AWS Community Builders:
Supported hardware and software requirements
It will be better to use Linux based machine with docker, git and curl. Other components will be installed during the Docker build procedure
I'll show you how to use Docker and Provisioned Mode (simple deployment mode) to deploy your Greengrass Gateway.
It's a quick and "dirty" way to get your AWS Greengrass environment operational. "Dirty" means that you can use your temporary admin credentials to onboard your AWS Greengrass Thing to AWS IoT Core.
In production, you need to generate in advance Thing certificates and configuration and upload them as part of your device provisioning process. More on that you can read here Install AWS IoT Greengrass Core software with AWS IoT fleet provisioning - AWS IoT Greengrass (amazon.com)
Setting up AWS Greengrass Core
Building Docker container
- Jump AWS IoT Greengrass Docker GitHub repo, clone it
git clone https://github.com/aws-greengrass/aws-greengrass-docker.git
Note 1. At the time of writing this article, 07.2023 Docker file used the latest version of AWS Greengrass - 2.10.3, so there is no need to make any changes to this parameter.
Note 2. You can safely ignore your Docker file environment variables because we will override them using "--env-file .env" parameter of the "docker run" command.
Add three components to the Docker image shadow-utils, libatomic, openssl11 and upgrade Java to version 17
shadow-utils - is required for AWS Greengrass to create user and group
libatomic, openssl11 - will be required by our custom secure tunnelling setup
Java 17 - you can ignore this step, depending on your needs
All these changes are related to lines 37 and 38 of the initial Docker file.
RUN yum update -y && yum install -y shadow-utils python37 tar unzip wget sudo procps which libatomic openssl11 && \
    amazon-linux-extras enable python3.8 && yum install -y python3.8 java-17-amazon-corretto-headless && \
    wget $GREENGRASS_RELEASE_URI && \
    rm -rf /var/cache/yum && \
    chmod +x /greengrass-entrypoint.sh && \
    mkdir -p /opt/greengrassv2 $GGC_ROOT_PATH && unzip $GREENGRASS_ZIP_FILE -d /opt/greengrassv2 && rm $GREENGRASS_ZIP_FILE
- Build your local AWS Greengrass container by running
docker build -t "my-iot-greengrass" ./
The container is ready, let's move on to the configuration.
Environment configuration
I'm going to show your the minimum ".env" file that we will use for configurations.
!!! It's very important to use the same syntax as in my example !!!
In .env file:
!!! Lines 1-3 are AWS Credentials. Very important to remove quotes if you do copy bash "export" commands.
Line four is the AWS region where you want to register your AWS Greengrass Thing
!!! Line five sets the Provisioning mode to "true", you need to use lowercase true, it's very important. This mode tells AWS Greengrass to use AWS Credentials for registration in AWS IoT Core upon launch
The last line, line six, sets the logging level to "INFO"
AWS_ACCESS_KEY_ID=ASIAxxxxxxxx
AWS_SECRET_ACCESS_KEY=WteUxxxx
AWS_SESSION_TOKEN=IQoJb3Jpxxxx
AWS_REGION=eu-central-1
PROVISION=true
LOG_LEVEL=INFO
Note. You can follow AWS guide to build a dedicated account for AWS Greengrass provisioning- Minimal IAM policy for installer to provision resources - AWS IoT Greengrass (amazon.com)
Please save this payload as a ".env" file and let's start your Greengrass container!
First start of the container
Before running the docker command, you need to create a folder called "green" inside your home folder using the command mkdir /home/$USER/green This folder will be mounted inside the container to preserve certificates and configuration of your AWS Greengrass Thing.
Then, in the folder with the ".env" file run this command
docker run --rm --init -it --net host --env-file .env -v /home/$USER/green:/greengrass/v2 --name my-iot-greengrass my-iot-greengrass
Overall, this command creates and runs a Docker container with specific configurations, environment variables, and mounted directories, providing a containerized environment for running an AWS Greengrass application. Let's break down each part of the command:
docker run: This instructs Docker to run a container based on the provided parameters.--rm: This flag tells Docker to automatically remove the container once it stops running. This helps to keep your system clean by removing temporary containers.--init: This flag ensures that an init process is started inside the container. It helps to handle signals and ensure proper process management.-it: This combines two flags:-i(interactive) and-t(pseudo-tty). It allows you to interact with the container through the command line.--net host: This flag sets the container's network mode to "host," which means the container shares the host's network stack. It allows the container to access network services using the host's network interface.--env-file .env: This flag specifies a file (in this case,.env) containing environment variables that will be passed to the container. The environment variables defined in the file can be accessed by processes running within the container.-v /home/$USER/green:/greengrass/v2: This flag mounts a host directory (/home/$USER/green) to a directory inside the container (/greengrass/v2). This allows files and data to be shared between the host and the container.--name my-iot-greengrass: This flag assigns a name ("my-iot-greengrass") to the running container. The name can be used to reference and manage the container later.my-iot-greengrass: This is the name of the Docker image or container that will be used to run the container. It represents the specific image or container configuration you want to use.
After running the docker command yous should find your Greengrass device in the AWS IoT Core console.
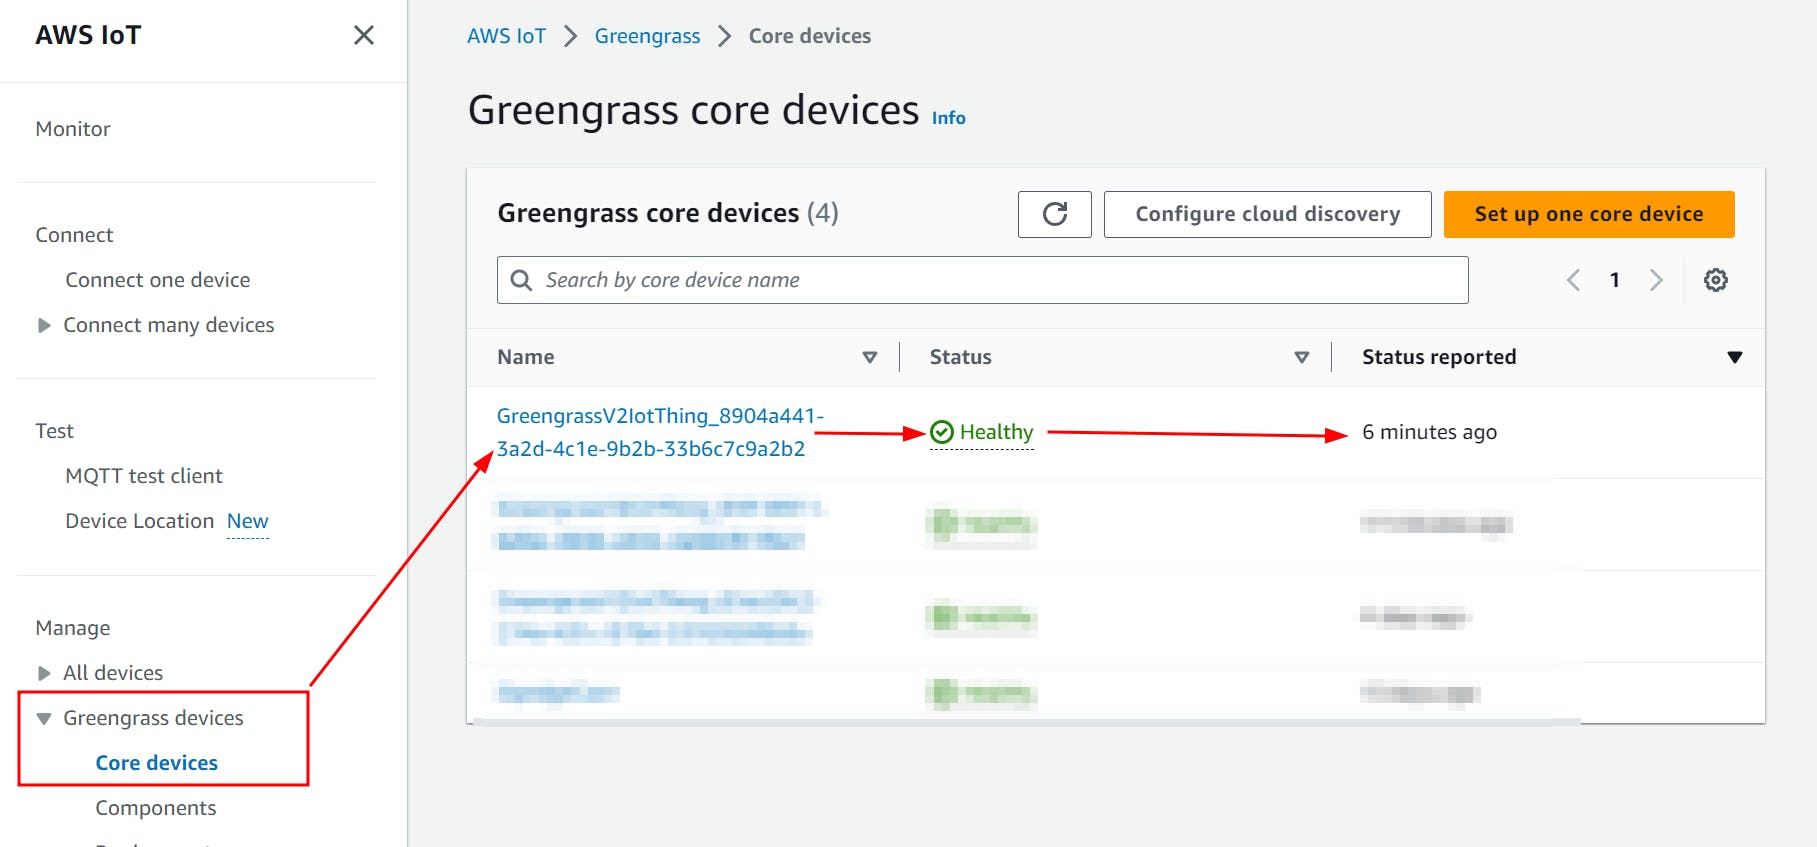
Figure 1. AWS IoT Console with registered Greengrass device
Congratulations your AWS Greengrass is up and running!
Summary
In this article, we built an AWS Greengrass docker image, created a configuration file with environment variables and successfully launched our custom build Docker container.
Newly registered AWS Greengrass Thing will appear in your AWS IoT Console.
Let's jump to the next part where we will deploy our Rest API server to our AWS Greengrass Thing!