


IoT Edge Runtime with AWS Greengrass. Build and deploy custom component.
This article guides you through the steps to deploy your application at the Edge.


Introduction
This part will be focused on deploying your custom component to the edge. To reach the goal we will use AWS Greengrass Custom components and Rest API server from Spring Framework Guide.
Our goal is to run a Java application in AWS Greengrass. After deploying the custom component to AWS Greengrass you will be able to reach Rest API at URL: http://localhost:8080/greeting
Parts
This series consists of four parts, each part is independent of another.
Introduction. In this part, we are talking about the use case and the AWS Greengrass itself
Setup. Here I'll show how to quickly launch Greengrass as a docker image on our computer
Before we start (skippable)
This section will guide you through the steps of building and running a Spring Boot application that exposes a RESTful web service. You will use the Gradle build tool to create a jar file that contains the application code and dependencies, and then run it locally on your machine.
The first step is to clone the GitHub repository that contains the source code for this tutorial. You can use the following command in your terminal:
git clone https://github.com/spring-guides/gs-rest-service.git
This will create a directory called gs-rest-service with several subdirectories. The one we are interested in is the complete directory, which contains the final version of the application.
Next, you need to navigate to the complete directory and build the jar file using Gradle. You can use the following commands in your terminal:
cd gs-rest-service/complete && ./gradlew build
This will compile the application code and run some tests. If everything is successful, you will see a message like this:
BUILD SUCCESSFUL in 27s 6 actionable tasks: 6 executed
The jar file will be generated in the build/libs directory. You can check its name and size using the following command:
ls -l build/libs
You should see something like this:
-rw-r--r-- 1 user user 2861 Jul 11 08:02 rest-service-0.0.1-SNAPSHOT-plain.jar
-rw-r--r-- 1 user user 19010618 Jul 11 08:02 rest-service-0.0.1-SNAPSHOT.jar
Finally, you can run the jar file using the Java command. You can use the following command in your terminal:
java -jar build/libs/rest-service-0.0.1-SNAPSHOT.jar
This will start the Spring Boot application and expose a RESTful web service at http://localhost:8080/greeting. You can test it using a web browser or a tool like curl. For example, you can use the following command in your terminal:
curl http://localhost:8080/greeting
You should see a JSON response like this:
{"id":1,"content":"Hello, World!"}
You can also pass a name parameter to customize the greeting message. For example, you can use the following command in your terminal:
curl http://localhost:8080/greeting?name=World
You should see a JSON response like this:
{"id":2,"content":"Hello, World!"}
Congratulations! You have successfully built and run a Spring Boot application that exposes a RESTful web service.
You will need the file rest-service-0.0.1-SNAPSHOT.jar to build your custom AWS Greengrass component
AWS Greengrass Custom Component
Process
The process of creating a custom component is described in Figure 1.
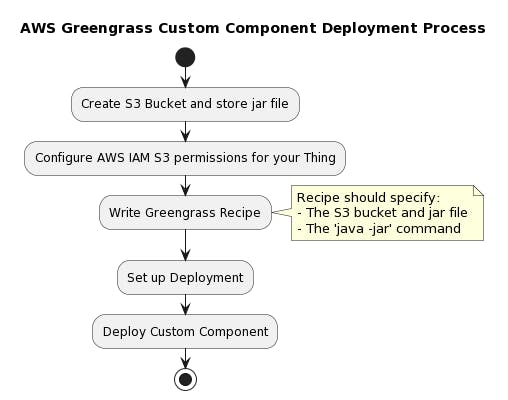
Figure 1. Visualizes the flow of your AWS Greengrass Custom Component Deployment Process:
Create S3 Bucket and store jar file - Set up an AWS S3 bucket and upload your jar file which contains your custom component code. Here you need to upload
rest-service-0.0.1-SNAPSHOT.jarinto the root of the bucketConfigure AWS IAM permissions - Set the necessary permissions for AWS Greengrass to access your newly created S3. We will create inline IAM policies for this.
Write Greengrass Recipe - This is a YAML document that specifies how AWS IoT Greengrass should configure and run the custom component. In our case, it should specify the S3 bucket, the jar file, and the
java -jarcommand to execute the component.Set up Deployment - We will use AWS Management Console to create a deployment. The deployment will include our AWS Greengrass Recipe.
Deploy Custom Component - Deploy the component to your Greengrass core device.
This is a very high-level flow and the specifics will depend on your particular requirements and environment. Please check the AWS documentation for further details and specific instructions.
Create S3 Bucket and store jar file (skippable)
In this section, you will learn how to create an S3 bucket and store a jar file using the AWS CLI. A jar file is a compressed archive that contains Java class files and other resources. You can use a jar file to package your custom component code and deploy it to AWS. In this example, you will use the rest-service-0.0.1-SNAPSHOT.jar file, which is a Spring Boot application that exposes a REST API.
To create an S3 bucket and store a jar file using the AWS CLI, you need to follow these steps:
Create an S3 bucket with a unique name. You can use the following command:
aws s3 mb s3://BUCKET_NAMEUpload your jar file to the root of the bucket. You can use the following command:
aws s3 cp rest-service-0.0.1-SNAPSHOT.jar s3://BUCKET_NAME/Verify that your jar file is uploaded successfully. You can use the following command:
aws s3 ls s3://BUCKET_NAME/
You have successfully created an S3 bucket and stored a jar file using the AWS CLI. You can now use this jar file to deploy your custom component to AWS.
Configure AWS IAM permissions
For AWS IoT Core to deploy our jar file to your AWS Greengrass Thing. The Thing needs to have permission to get the jar file from S3. This section will show how to configure Thing permissions.
I assume that you used the default settings during the AWS Greengrass provisioning process. As a result, IAM Role called GreengrassV2TokenExchangeRole was created.
Our goal is to attach an inline policy that provides access to the S3 bucket to this role. To do this let's:
- Create a file called
s3-policy.jsonand change BUCKET_NAME to your bucket created earlier.
{
    "Version": "2012-10-17",
    "Statement": [
        {
            "Effect": "Allow",
            "Action": [
                "s3:GetObject"
            ],
            "Resource": "arn:aws:s3:::BUCKET_NAME/*"
        }
    ]
}
- Execute command
aws iam put-role-policy --role-name GreengrassV2TokenExchangeRole --policy-name AccessToBucket --policy-document file://s3-policy.json
We successfully granted permission to access our Jar!
Write Greengrass Recipe
The next step is to define where to find your app and how to run it.
Let's jump directly to the AWS Greengrass custom component recipient saved as recipe.yaml:
---
RecipeFormatVersion: "2020-01-25"
ComponentName: "org.javatask.example.spring.RestApi"
ComponentVersion: "1.0.0"
ComponentType: "aws.greengrass.generic"
ComponentDescription: "Running Rest API at Edge"
ComponentPublisher: "javatask"
Manifests:
- Platform:
    os: "linux"
  Name: "Linux"
  Lifecycle:
    Run: "java -jar {artifacts:path}/rest-service-0.0.1-SNAPSHOT.jar"
  Artifacts:
  - Uri: "s3://BUCKET_NAME/rest-service-0.0.1-SNAPSHOT.jar"
Lifecycle: {}
This YAML script represents an AWS Greengrass component recipe. It is a blueprint that AWS IoT Greengrass uses to create and run the component.
Here's what each field of this AWS Greengrass recipe specifies:
RecipeFormatVersion: This defines the format version of the component recipe. The version here is "2020-01-25".
ComponentName: This specifies the unique name of the component. In this case, the name is "org.javatask.example.spring.RestApi". The name should follow a reverse domain-name format, similar to Java packages.
ComponentVersion: This specifies the version of the component. Here, the version is "1.0.0".
ComponentType: This field identifies the type of the component. Here, it's defined as "aws.greengrass.generic", which means it is a general-purpose component.
ComponentDescription: This is a brief description of the component. Here, it describes that this component is "Running Rest API at Edge".
ComponentPublisher: This identifies the publisher of the component. In this case, it's "javatask".
Manifests: This is a list of instructions and data that tell AWS IoT Greengrass how to configure and run the component on each device. Here, the manifest includes the platform specification (Linux), a lifecycle event, and an artifact. The lifecycle event is a "Run" command which triggers a Java application with a jar file. The artifact is a Uri pointing to a jar file located in an Amazon S3 bucket.
Lifecycle: The lifecycle configuration for this component is empty in this recipe, meaning no start, install, configure, or other lifecycle hooks are defined.
So, in essence, this AWS Greengrass component recipe is a blueprint for running a Java-based Rest API service on Linux-based edge devices. It fetches the jar file (rest-service-0.0.1-SNAPSHOT.jar) from an Amazon S3 bucket and runs it using Java.
To create this custom component run the next command:
aws greengrassv2 create-component-version --inline-recipe fileb://recipe.yaml
The successful result shouldgive you the next output:
{
    "arn": "arn:aws:greengrass:eu-central-1:1111111:components:org.javatask.example.spring.RestApi:versions:1.0.0",
    "componentName": "org.javatask.example.spring.RestApi",
    "componentVersion": "1.0.0",
    "creationTimestamp": "2023-07-11T10:19:31.815000+02:00",
    "status": {
        "componentState": "REQUESTED",
        "message": "NONE",
        "errors": {},
        "vendorGuidance": "ACTIVE",
        "vendorGuidanceMessage": "NONE"
    }
}
After component creation let's deploy it to your AWS Greengrass Thing.
Set up Deployment and Deploy Custom Component
Before we will deploy our custom component to the AWS Greengrass, let's check that there is no other Rest API server running on our machine. Run the command:
curl http://localhost:8080/greeting
This command should fail.
The next step is to get ARN of your AWS Greengrass device, and run the command:
aws iot list-things
You should get JSON response with a single Thing, sample:
{
    "things": [
        {
            "thingName": "GreengrassV2IotThing_8904a441-3a2d-4c1e-9b2b-33b6c7c9a2b2",
            "thingArn": "arn:aws:iot:eu-central-1:111111111:thing/GreengrassV2IotThing_8904a441-3a2d-4c1e-9b2b-33b6c7c9a2b2",
            "attributes": {},
            "version": 1
        }
    ]
}
Copy thingArn to the next command:
aws greengrassv2 create-deployment \
  --target-arn arn:aws:iot:REGION:ACCOUNT_ID:thing/THING_NAME \
  --deployment-name JavataskRestApi \
  --components '{"org.javatask.example.spring.RestApi": {"componentVersion": "1.0.0"}}'
You will get a response
{
    "deploymentId": "d25021ff-99e4-4e06-9bc9-5d07294b91e6"
}
Use this deploymentId to check the status of your deployment via:
aws greengrassv2 get-deployment --deployment-id d25021ff-99e4-4e06-9bc9-5d07294b91e6
You need to wait for the "deploymentStatus": "COMPLETED" response
{
    "targetArn": "arn:aws:iot:eu-central-1:111111111:thing/GreengrassV2IotThing_8904a441-3a2d-4c1e-9b2b-33b6c7c9a2b2",
    "revisionId": "3",
    "deploymentId": "d25021ff-99e4-4e06-9bc9-5d07294b91e6",
    "deploymentName": "JavataskRestApi",
    "deploymentStatus": "COMPLETED",
    "components": {
        "org.javatask.example.spring.RestApi": {
            "componentVersion": "1.0.0"
        }
    },
    "creationTimestamp": "2023-07-11T10:46:16.091000+02:00",
    "isLatestForTarget": true,
    "tags": {}
}
Congratulations!!! You successfully deployed your custom component!!! 🎈🎉 🎈🎉 🎈🎉
To check that all works as excepted run the command:
curl http://localhost:8080/greeting
You should get the response
{"id":1,"content":"Hello, World!"}
Summary
This article guides you through deploying a custom component to the edge using AWS Greengrass and a Spring Framework-based REST API server. The process involves creating an S3 bucket, configuring AWS IAM permissions, writing a Greengrass recipe, setting up deployment, and deploying the custom component. By the end, you will be able to run a Java application in AWS Greengrass and access the REST API at a specific URL.