


Deploying a Single Page Application (SPA) on AWS: A Beginner's Guide. Part 4. Authentication
Enhancing security


Introduction
In this section, we will implement authentication for our Frontend using AWS Cognito as the OpenID server. Figure 1 illustrates the goal of this part.
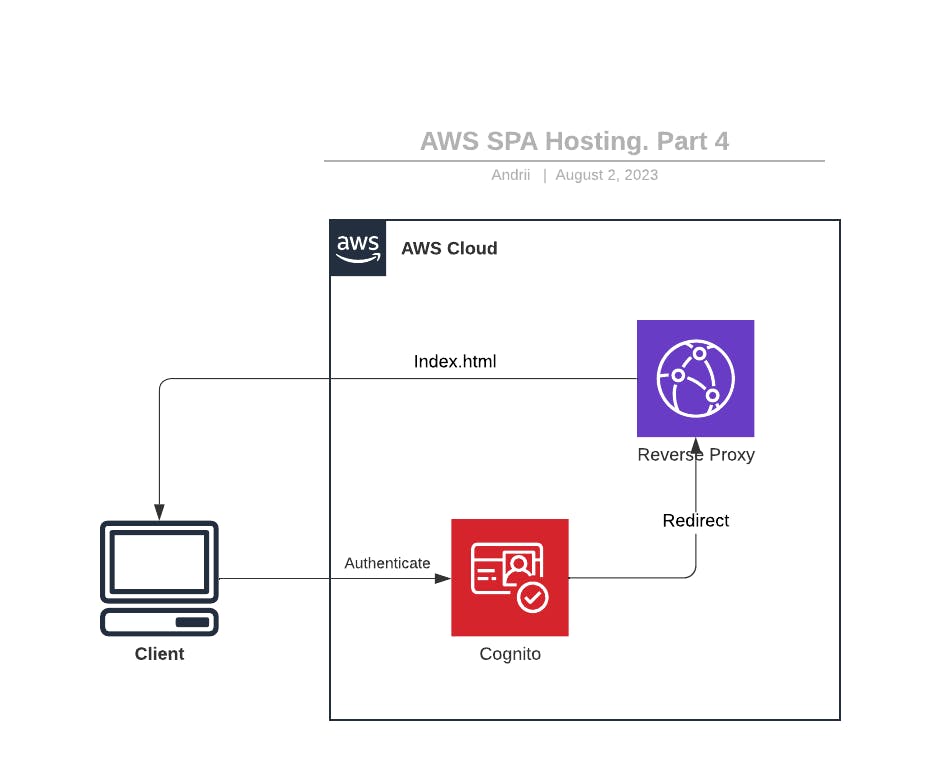
Figure 1: Secure Single Page Application
Source code repository
javatask/aws-spa-beginners-guide: Code for the blog series on porting single page application to AWS (github.com)
Configuration
But before we dive into the implementation, let's outline the steps we'll take:
Configure AWS Cognito: We'll set up an AWS Cognito User Pool and Client. To do this, we'll need a callback URL based on the frontend URL and a User Pool ID to configure authentication for the frontend.
Note: In a production environment, you typically use Route53 subdomains and domains to configure all URLs.
Deploy AWS Cognito
Deploy User Pool
To create AWS Cognito, we'll use a CloudFormation (CFN) template with a single parameter, CallbackUrl. This URL is where Cognito will redirect users after they complete the authentication process. You should use the CloudFront URL from Part 2 as the CallbackUrl.
Here's the CFN template for deploying AWS Cognito:
AWSTemplateFormatVersion: "2010-09-09"
Description: Static contents distribution using S3 and CloudFront.

Parameters:
  CallbackUrl:
    Type: String
    Description: Callback URL for Cognito hosting UI, example https://111111.cloudfront.net/callback.html

Resources:
  CognitoUserPool:
    Type: AWS::Cognito::UserPool
    UpdateReplacePolicy: Retain
    DeletionPolicy: Retain
    Properties:
      UserPoolName: !Sub "${AWS::StackName}-user-pool"
      MfaConfiguration: "OFF"
      AdminCreateUserConfig:
        AllowAdminCreateUserOnly: true
        UnusedAccountValidityDays: 90
      AutoVerifiedAttributes:
        - email
      Policies:
        PasswordPolicy:
          MinimumLength: 6
          RequireLowercase: false
          RequireNumbers: false
          RequireSymbols: false
          RequireUppercase: false
      Schema:
        - Name: name
          AttributeDataType: String
          Mutable: true
          Required: true
        - Name: email
          AttributeDataType: String
          Mutable: false
          Required: true
      AliasAttributes:
        - email
        - preferred_username

  CognitoUserDomain:
    Type: AWS::Cognito::UserPoolDomain
    Properties:
      Domain: !Sub "${AWS::StackName}"
      UserPoolId: !Ref CognitoUserPool

  CognitoUserPoolClient:
    Type: AWS::Cognito::UserPoolClient
    Properties:
      ClientName: UIClient
      GenerateSecret: false
      AllowedOAuthScopes:
        - openid
      AllowedOAuthFlowsUserPoolClient: true
      CallbackURLs:
        - !Ref CallbackUrl
      DefaultRedirectURI: !Ref CallbackUrl
      AllowedOAuthFlows:
        - code
      SupportedIdentityProviders:
        - COGNITO
      UserPoolId: !Ref CognitoUserPool

Outputs:
  CognitoPoolId:
    Value: !Ref CognitoUserPool
  OAuthClientId:
    Value: !Ref CognitoUserPoolClient
This CFN template creates several AWS Cognito resources:
CognitoUserPool: A user pool in AWS Cognito with a custom password policy and schema. The pool name is generated based on the stack name, and it enforces a minimum password length of 6 characters. It allows users to sign in with either email or preferred username and auto-verifies email addresses.CognitoUserDomain: A user pool domain associated with the user pool, where the domain name is also generated based on the stack name.CognitoUserPoolClient: A client associated with the user pool, named 'UIClient'. This client allows OAuth with the 'code' flow and specifies the callback and default redirect URIs based on theCallbackUrlparameter.
The template also retains user pool resources during stack updates and deletions.
Create a User
Now, let's create a user in the user pool. You can use the following AWS CLI command, replacing the placeholders with your actual values:
aws cognito-idp admin-create-user --user-pool-id <UserPoolId> --username <Username> --temporary-password <TemporaryPassword> --user-attributes Name=email,Value=<EmailAddress>
You will receive a JSON response containing user details, including the user's sub (subject) and email address.
Configure Frontend with Cognito Hosted UI
To configure your frontend assets to use the AWS Cognito Hosted UI, you should use the code provided in the p4 folder in git repository.
Install Node.js (Optional)
If you don't already have Node.js installed, you can install it using Node Version Manager (NVM) with the following commands:
curl -o- https://raw.githubusercontent.com/nvm-sh/nvm/v0.39.4/install.sh | bash
nvm install --lts
Configure, Build, and Deploy UI
Inside the tutorial/part4/ui folder, create a settings.js file with the following content, using the values from the AWS CloudFormation stack outputs for <CognitoPoolId> and <OAuthClientId>:
export const settings = {
    authority: 'https://cognito-idp.<AWS_REGION>.amazonaws.com/<CognitoPoolId>',
    client_id: '<OAuthClientId>',
    redirect_uri: 'https://<YOUR_CLOUDFRONT_NUMBER>.cloudfront.net/callback.html',
    response_type: 'code',
    scope: 'openid',
    revokeTokenTypes: ["refresh_token"],
    automaticSilentRenew: false,
};
Then, install the required libraries by running the following command in the tutorial/part4/ui folder:
npm install
Build the application:
npm run build
Finally, upload the application to your S3 bucket:
aws s3 sync dist/ s3://your-unique-stack-name-111111111
Access your CloudFront URL, and you should see two buttons for sign-up and login.
Get Authorization Token
Click on the login button, and you'll be redirected to the hosted AWS Cognito page for authentication. After changing your password, you'll be redirected back to your CloudFront URL.
In the browser console, you should find a JSON object containing an id_token. This token is required to access the backend API.
You can examine the JWT token using the jwt.io website.
With the authentication token in hand, you are now ready to call the backend API.
Summary
In this part, we covered how to add authentication to a frontend application using AWS Cognito as an OpenID server. We configured AWS Cognito, added an authentication layer to the Frontend, and obtained a JSON Web Token (JWT). We provided an AWS CloudFormation template to create the necessary resources and guided you through creating a user, configuring the Frontend with Cognito
Hosted UI, and obtained an authorization token.
In the next part, we will connect all the components to create a fully functional end-to-end (E2E) application.